Tutorial on Integrating Flex with Struts based application using Remoting

June 9, 2010

This article explains how to add Adobe Flex front end to Java + Struts web application. In this article we will be using BlazeDS Remoting service to communicate with the server from Flex application. Sample application in this article uses Flex 4, Struts 2.1.8 and BlazeDS 4. First lets have a look at Java + Struts web application which uses HTML to display the data.

HTML + Struts + Java web application

I have a web application called flexstrutssample created in which I have the following files.

Contents of flexstrutssample folder:

– WEB-INF/Classes

– WEB-INF/lib

  • Struts jar files

– WEB-INF/web.xml

list.jsp

listasxml.jsp

The SimpleCustomerService class has methods to communicate with Database and perform CRUD operations on the Customer table. In this article we will use the getAllCustomers() method in SimpleCustomerService class, which returns all the SimpleCustomer entries in the database.

Signature of getAllCustomers():

 
 public ArrayList<SimpleCustomer> getAllCustomers(){
 //return all customers from the database
 }

The CustomerAction class extends from ActionSupport class. CustomerAction class invokes the getAllCustomers() method in SimpleCustomerService class and returns Action.SUCCESS.

The execute() method in CustomerAction class:

 
public String execute() {
 SimpleCustomerService service = new SimpleCustomerService();
 this.customers = service.getAllCustomers();
 return Action.SUCCESS;
 }

In Struts configuration file (struts.xml) we have the result “success” mapped to list.jsp for the action with name=”list”.

 
<action method="execute">
 <result>/list.jsp</result>
 </action>

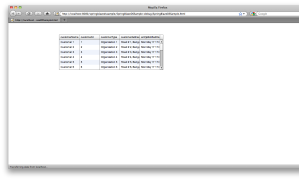
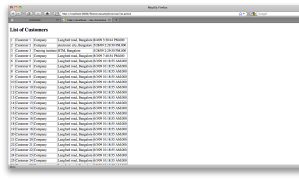
The list.jsp file accesses the list of customers from the simpleCustomers variable and renders the same in a HTML table as shown in the image below.

Adding Flex front end

We have a simple web application that fetches records from database and displays the records in a HTML table. If you are using Rich Internet Applications (RIA) framework like Flex as front end for your applications, you can use rich and interactive controls like DataGrid.

If you observe list.jsp is returning HTML, so that browser will render the data in a table. Since we will be using Adobe Flex framework to create the user interface for the application, we don’t have to return HTML from the server; All we need to return from the server is the data that needs to be displayed to the user.

The data sent from the server can be in one of the text-based formats like XML or JSON, in that case you have to create a JSP/Servlet which will return the data in the text-based format chosen and the data has to be parsed on the client side as explained in this article Tutorial on Integrating Flex with Struts based application using HTTP Service

Alternatively you can chose to use Flex Remoting. Using Flex Remoting you can invoke methods in native Java classes on the server and the data is transferred in AMF format. If you use Flex Remoting, you don’t have to create an additional JSP/Servlet to represent the data in text-based format.

For using Flex Remoting you need libraries like BlazeDS on the server, so lets deploy BlazeDS jar files and expose the SimpleCustomerService class as Remoting service.

Deploying BlazeDS jar files

Step 1:

Download release build of BlazeDS. BlazeDS release builds are available at this URL http://opensource.adobe.com/wiki/display/blazeds/Release+Builds Click on “Download the BlazeDS binary distribution” to download the binary distribution. Binary distribution has just jar files and other configuration files required.

Step 2:

Go to folder where you saved the downloaded file in Step 1. You would have downloaded a file named blazeds-bin-4.0.0.14931.zip. Extract the content in this file to a folder named blazeds-bin-4.0.0.14931

Step 3:

In the blazeds-bin-4.0.0.14931 folder you will find a file named blazeds.war and blazeds-bin-readme.htm. blazeds-bin-readme.htm contains terms and conditions and license details. blazeds.war contains required jar files and configuration files for setting up BlazeDS.

Extract the content in blazeds.war file into a folder called blazeds. You can try renaming the file to blazeds.zip and extract the contents using tools like winzip.

blazeds – this is the folder in which we have blazeds.war content extracted into  in Step 3

flexstrutssample – this is the web application folder with Java + Struts based application

Step 4:

Copy all .jar files from blazeds/WEB-INF/lib to flesstrutssample/WEB-INF/lib

Step 5:

Copy blazeds/WEB-INF/flex folder to flexstrutssample/WEB-INF

This folder (blazeds/WEB-INF/flex) contains BlazeDS configuration files. Use these files to configure Remoting/Messaging/Proxy services.

Step 6:

Now we will add Servlet mapping for BlazeDS Servlet named MessageBrokerServlet, so that BlazeDS is invoked when you send request for a Remoting/Messaging/Proxy destination using any of the channels supported.

Open flexstrutssample/WEB-INF/web.xml and copy the Servlet mapping for MessageBrokerServlet and the session listener. You can either copy the content below or copy it from the blazeds/WEB-INF/web.xml

You can view the web.xml used in this sample here – http://sujitreddyg.com/fb4articles/flexandstruts/web.xml.txt

<!-- Http Flex Session attribute and binding listener support -->
<listener>
<listener-class>flex.messaging.HttpFlexSession</listener-class>
</listener>

<!-- MessageBroker Servlet -->
<servlet>
<servlet-name>MessageBrokerServlet</servlet-name>
<display-name>MessageBrokerServlet</display-name>
<servlet-class>flex.messaging.MessageBrokerServlet</servlet-class>
<init-param>
<param-name>services.configuration.file</param-name>
<param-value>/WEB-INF/flex/services-config.xml</param-value>
</init-param>
<load-on-startup>1</load-on-startup>
</servlet>

<servlet-mapping>
<servlet-name>MessageBrokerServlet</servlet-name>
<url-pattern>/messagebroker/*</url-pattern>
</servlet-mapping>

Setting up BlazeDS RDSDispatchServlet

After setting up BlazeDS, you have to enable RDSDisptachServlet, which is used by Flash Builder 4 to get destination details. Copy the Servlet URL mapping and declaration below and add to your web application web.xml file.

<servlet>
 <servlet-name>RDSDispatchServlet</servlet-name>
 <display-name>RDSDispatchServlet</display-name>
 <servlet-class>flex.rds.server.servlet.FrontEndServlet</servlet-class>
 <init-param>
 <param-name>useAppserverSecurity</param-name>
 <param-value>false</param-value>
 </init-param>
 <load-on-startup>10</load-on-startup>
 </servlet>
 <servlet-mapping id="RDS_DISPATCH_MAPPING">
 <servlet-name>RDSDispatchServlet</servlet-name>
 <url-pattern>/CFIDE/main/ide.cfm</url-pattern>
 </servlet-mapping>

Creating Remoting Service

To invoke public methods in a Java class from Flex application, you need expose the Java class as Remoting service destination. Remoting service destinations are configured in a XML file named remoting-config.xml, which can found in flexstrutssample/WEB-INF/flex folder. Add the highlighted text below to the remoting-config.xml file.

<?xml version="1.0" encoding="UTF-8"?>
<service class="flex.messaging.services.RemotingService">
    <adapters>
        <adapter-definition default="true"/>
    </adapters>
    <default-channels>
        <channel ref="my-amf"/>
    </default-channels>
<destination>
  <properties>
    <source>com.adobe.services.SimpleCustomerService</source>
  </properties>
</destination>
</service>

We created a Remoting destination whose id is CustomerService, which is mapped to SimpleCustomerService class. In the steps below we will see how to invoke methods in SimpleCustomerService class from Flex application, rather we will see how to consume Remoting services from Flex applications.

Creating Flex Application

Install Flash Builder 4 from here – http://www.adobe.com/products/flashbuilder/

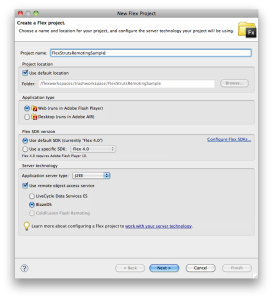
Launch Flash Builder and create new Flex project from File -> New -> Flex Project menu. You will see a window as shown in the image below. Enter the project details as explained below the image

In this screen:

  1. Enter project name
  2. Set “Web (runs in Adobe Flash Player)” as the application type
  3. Use default Flex SDK (Flex 4.0)
  4. Set the application server type to J2EE
  5. Select BlazeDS
  6. Click on Next to continue

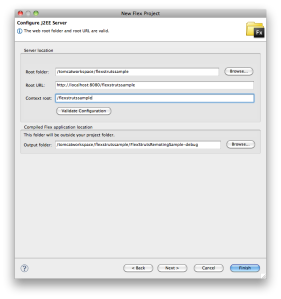
Configure J2EE server settings

In this screen:

  1. Set the Root folder to the root folder of your web application with BlazeDS configured. Its /tomcatworkspace/flexstrutssample in this sample
  2. Set the Root URL to root URL of your BlazeDS enabled web application. Its http://localhost:8080/flexstrutssample in this sample.
  3. Set the Context root to context root of your BlazeDS enabled web application. Its /flexstrutssample in this sample.
  4. Leave the output folder to default value
  5. Click on validate configuration button to check if the values are properly configured. You should see a message at the top saying web root folder and root URL are valid.
  6. Click finish to continue

Flash Builder will create a new project along with a default application file called FlexStrutsRemotinSample.mxml. Flex framework has a class called RemotObject using which you can consume Remoting services i.e invoke methods in Java class on the server.

You can manually write code to send the request or alternatively act smart and use the Data Centric Development (DCD) feature in Flash Builder 🙂 Flash Builder can generate the code to send request to the server to get the data, lets see how.

Creating Service using DCD

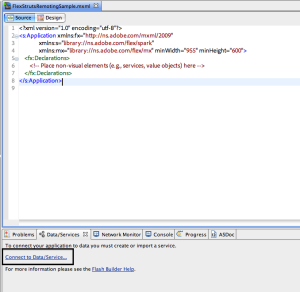
In this screen:

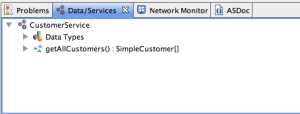
  1. Select the Data/Services window shown in the image above. If this is not visible, select it from Window -> Data/Services
  2. Click on “Connect to Data/Service” (Highlighted in the image above) in the Data/Services window
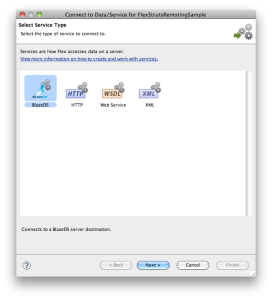
  3. Window as shown in the image below will be launched

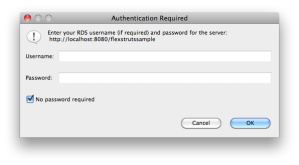
Select BlazeDS and click on Next. Flash Builder will display a window asking for RDS credentials. Since we turned off security for our RDSServlet by setting the useAppserverSecurity parameter to false in the web.xml, select No password required and click on OK to continue.

Selecting Remoting destination

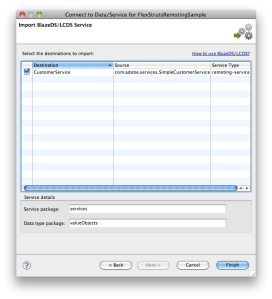
You can see that Flash Builder listed all destinations exposed in the screen below.

In this screen we are selecting the destination the newly created service should use. All destinations available will be displayed. Select a destination (CustomerService in this sample) and click on Finish to continue.

Code for invoking the Remoting service will be generated, you can see the service and its operations (methods exposed by the Java class) being displayed in the Data/Services window and the source code for the same in the package explorer.

Flash Builder 4 introspects return types for the Java class methods and creates AS3 classes for any custom Java classes.

Binding data/service to UI controls

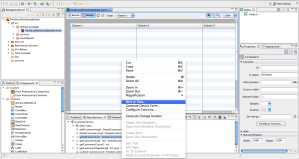
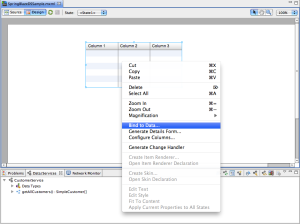
Switch to design view and drag and drop a DataGrid component as shown in the image below.

In this screen:

  1. Switch to design view
  2. Change the Application layout to spark.layouts.VerticalLayout using the properties panel
  3. Drag and drop a DataGrid from the components panel on to the design area
  4. Set the width and height properties of the DataGrid to 100%
  5. Select the DataGrid. Right click on the DataGrid and select “Bind to Data …”

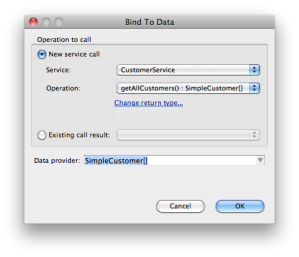
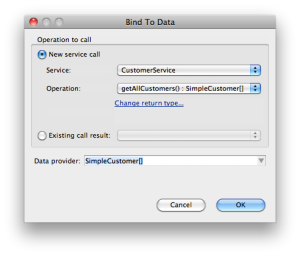
A window as shown in the image below will be launched.

In this screen:

  1. Select New service call because there are no existing services in the current application.
  2. Select CustomerService from Service list.
  3. Select getAllCustomers():SimpleCustomer[] from operations list
  4. Selct SimpleCustomer[] as Data provider
  5. Click OK

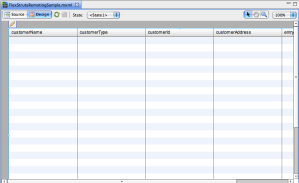
You can see the DataGrid with columns added for each property of the SimpleCustomer class in the design view as shown in the image below.

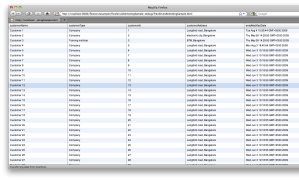
Save and run the application. You can see application with data retrieved from the server and displayed in the DataGrid as shown in the image below.

We had a Java + Struts based web application for which we added a Flex front end in few minutes, without making any modifications to server side code 🙂

You can find more articles on integrating Flex with various server technologies at this URL https://sujitreddyg.wordpress.com/flash-builder-4

It’s your application, make it Richer 🙂

Spring BlazeDS and Flash Builder Data Centric Development

May 17, 2010

Data Centric Development (DCD) in Flash Builder 4 allows developers to build Flex front end for any back-ends very easily.

Spring BlazeDS project from SpringSource makes it easier to create spring powered Rich Internet Applications using Adobe Flex.

In this article we will see how we can use Adobe Flex, Flash Builder 4, BlazeDS, Spring, Spring BlazeDS and Java to create Rich Internet Application.

Lets start with setting up web application on the server.

Create Web Application

Start by creating a web application name springblazedssample. You can do that by creating a folder named springblazedssample under your web server document folder.

Set up BlazeDS

Set up BlazeDS for web application created in previous step as explained in this URL https://sujitreddyg.wordpress.com/2009/04/07/setting-up-blazeds/

Set up Spring BlazeDS

Download Spring BlazeDS from this URL http://s3.amazonaws.com/dist.springframework.org/release/FLEX/spring-flex-1.0.3.RELEASE.zip

You will be downloading file named spring-flex-1.0.3.RELEASE.zip. After downloading, extract the contents of spring-flex-1.0.3.RELEASE.zip into a folder called spring-flex-1.0.3.RELEASE. Copy org.springframework.flex-1.0.3.RELEASE.jar from spring-flex-1.0.3.RELEASE/dist folder to your web application under springblazedssample/WEB-INF/lib

Set up Spring

Download Spring from this URL http://s3.amazonaws.com/dist.springframework.org/release/SPR/spring-framework-3.0.2.RELEASE.zip

You will be downloading file named spring-framework-3.0.2.RELEASE.zip. Extract contents of spring-framework-3.0.2.RELEASE.zip into a folder named spring-framework-3.0.2.RELEASE. Copy all .jar files under spring-framework-3.0.2.RELEASE/dist folder to your web application folder under springblazedssample/WEB-INF/lib

Add Dependencies (3)

1. Download cglib-nodep-2.2.jar from this URL http://sourceforge.net/projects/cglib/files/cglib2/ Copy the same into your web application folder under springblazedssample/WEB-INF/lib

2. Download backport-util-concurrent .jar from this URL http://backport-jsr166.sourceforge.net/ Copy the same into your web application folder under springblazedssample/WEB-INF/lib

3. Download aopalliance.zip from this URL http://sourceforge.net/projects/aopalliance/files/ You will find aopalliance.zip under section called 1.0

Extract the contents of aopalliance.zip into a folder named aopalliance and copy aopalliance.jar into your web application folder under springblazedssample/WEB-INF/lib

Configuring Spring MVC Dispatcher and RDS Servlets

Download the web.xml with MVC Dispatcher servlet and RDS Servlet (used by Flash Builder) definitions and mappings from here http://sujitreddyg.com/fb4articles/springblazeds/web.xml. Replace springblazedssample/WEB-INF/web.xml with the downloaded web.xml

Configuring Spring managed beans

In this sample we will use SimpleCustomerService.java and SimpleCustomer.java. We will configure SimpleCustomerService as spring managed bean and expose the same as Remoting Service to consume from Flex application. Download web-application-config.xml from here http://sujitreddyg.com/fb4articles/springblazeds/web-application-config.xml Place web-application-config.xml in your web application folder under springblazedssample/WEB-INF/config folder.

In web-application-config.xml:

  • We configured BlazeDS Message Broker Servlet as spring managed bean using <flex:message-broker/> tag.
  • We exposed SimpleCustomerService bean (id=CustomerService) as BlazeDS Remoting Service destination by adding <flex:remoting-destination/> tag.

Download the Java class files used in this sample from here http://sujitreddyg.com/fb4articles/springblazeds/javaclasses.zip. You will be downloading a file named javaclasses.zip. Extract javaclasses.zip into a folder named javaclasses and copy folder named com under javaclasses into your web application folder under springblazedssample/WEB-INF/classes folder.

We have our server environment setup; lets create Flex application, which consumes SimpleCustomerService exposed as Remoting service destination.

Install Flash Builder 4

Download and install Flash Builder 4 from here http://www.adobe.com/products/flashbuilder/

Create new Flex project

Create new Flex from File -> New -> Flex Project menu.

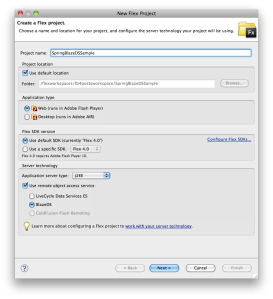
Enter project details

In this screen:

  1. Set project name as SpringBlazeDSSample
  2. Set “Web (runs in Adobe Flash Player)” as the application type
  3. Use default Flex SDK (Flex 4.0)
  4. Set the application server type to J2EE
  5. Select BlazeDS
  6. Click Next to continue

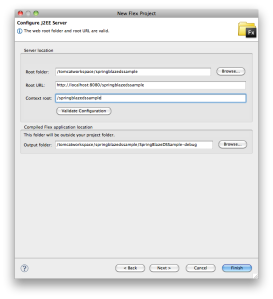
Configure J2EE server settings

In this screen:

  1. Set the Root folder to the root folder of your web application with BlazeDS configured. Its /tomcatworkspace/springblazedssample in this sample
  2. Set the Root URL to root URL of your web application. Its http://localhost:8080/springblazedssample in this sample.
  3. Set the Context root to context root of your BlazeDS enabled web application (springblazedssample).
  4. Leave the output folder to default value.
  5. Click on validate configuration button and see if the configuration is valid.
  6. Click finish to continue.

DCD or Data-Centric Development is one of the advancements to the Flash Builder 4. Let’s see how easily we can create a Flex application that consumes BlazeDS Remoting service (SimpleCustomerService) using DCD.

Creating Service using DCD

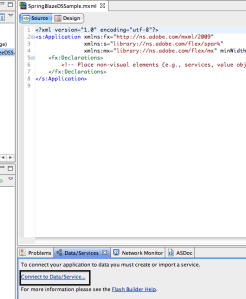
  1. Select the Data/Services window shown in the image above. If this is not visible, select it from Window -> Data/Services
  2. Click on “Connect to Data/Service” (highlighted in the image above) in the Data/Services window
  3. Window as shown in the image below will be launched

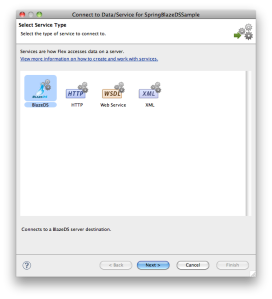
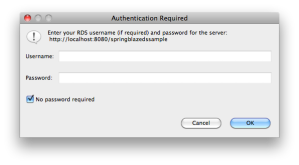
Select BlazeDS and click on Next. Flash Builder will display a window asking for RDS credentials. Since we turned off security for our RDSServlet by setting the “useAppserverSecurity” parameter to “false” in the web.xml, select “No password required” and click on OK to continue.

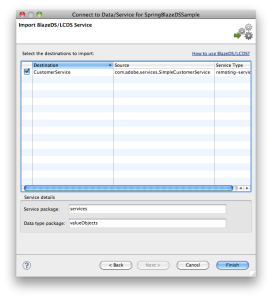
Selecting Remoting destination

You can see that Flash Builder listed SimpleCustomerService bean exposed as Remoting Service destination using <flex:remoting-detination/> tag. Similarly any other Remoting service destinations will be listed here. Select a destination (CustomerService in this sample) for which you want the code to be generated and click on Finish to continue.

Code for invoking the Remoting service will be generated, you can see the service and its operations (public methods of the Java class) being displayed in the “Data/Services” window in the image below and source files for the same in Flash Builder package explorer.

Flash Builder 4 introspects return types for the Java class methods and creates AS3 classes for any custom Java data types.

Binding data/service to UI controls

Other than generating code to consume services from Flex applications, Flash Builder can also generate code to bind the service result to a UI component. Switch to design view and add a DataGrid component as shown in the image below.

Select the DataGrid. Right click on the DataGrid and select “Bind to Data …” as shown in the image above. A window as shown in the image below will be launched.

In this screen:

  1. Select “New service call”.
  2. Select “CustomerService” from the list of services.
  3. Select “getAllCustomers():SimpleCustomer[]” from the operations list.
  4. Select SimpleCustomer[] as Data Provider.
  5. Click OK to continue.

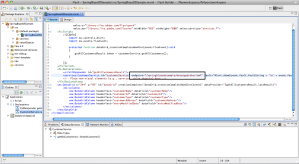
Switch to code view and set the endpoint property of the CustomerService (CustomerService instance added to SpringBlazeDSSample.mxml) to /springblazedssample/messagebroker/amf as shown in the image below.

Save and run the application. Your application will invoke the getAllCustomers() method in SimpleCustomerService class on the server and displays the returned data in the DataGrid as shown in the image below.

You can find more tutorials on Flash Builder 4 here  https://sujitreddyg.wordpress.com/flash-builder-4/

Adobe Flex Rocks 🙂


Updated Flash Builder 4 Tutorials

March 31, 2010

Flash Builder 4 is released and available for download here http://www.adobe.com/products/flashbuilder/ There lots of new features in Flash Builder 4, you can find top new features here http://www.adobe.com/products/flashbuilder/?view=topnew

I updated my article on Flash Builder 4 for the release version. You can find the complete list here https://sujitreddyg.wordpress.com/flash-builder-4/.

Following are the articles updated:

BlazeDS/Java/LCDS

Building Flex application for BlazeDS Remoting destinations using Flash Builder 4

Building Flex applications for Java based HTTP Services using Flash Builder 4

Using Flash Builder 4 for earlier BlazeDS builds

Tutorial on model-driven development using Flash Builder 4 and LiveCycle DS 3

Building Flex application for LCDS Data Management services using Flash Builder 4

Building Flex and Java based CRUD application using Flash Builder 4

Building Flex and LCDS based CRUD application using Flash Builder 4

PHP

Bulding Flex application for a PHP class using Flash Builder 4

Building a database based app using Flex and PHP with Flash Builder 4

HTTP Service

Building Flex applications for Java based HTTP Services using Flash Builder 4

Building Flex applications for PHP based HTTP Services using Flash Builder 4

Consuming JSON using Data Centric Development (DCD) feature in Flash Builder 4

OTHER

Built in Data Paging using Flash Builder 4

Client Side Data Management using Flash Builder 4

Adobe Rocks 🙂


Application developed using Flex 4 and DCD targeting Flash Player on Android Device

March 4, 2010

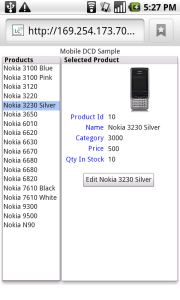
Used Flex 4 and Data-Centric Development (DCD) in Flash Builder 4 to create a application which can be used in devices with Flash Player 10.1 support. This applications loads data from tomcat server configured with LiveCycle DS; Lets the user view the data and edit the same. Please find below the screen shots of the application running on Google Nexus One with Flash Player 10.1 🙂

Note: I took the screen shots of the application running on Google Nexus One phone using Dalvik Debug Monitor packaged with Android SDK

I also wanted to see if I can use the same application to target Flash Player running on bigger screens like Mac. Since I used Flex 4, I just created different skins for my custom components so that the applications looks good when launched from a Mac or PC. After creating the skins, all I had to do was to change the <style> tag in the main application to point to the css configured with my new skins and re-compile my application. Please see below the screen shot of the application launched from Firefox on my mac 🙂

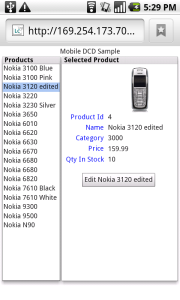
The application developed here is consuming data from a Data Management Service destination of LiveCycle DS (LCDS) and so any changes to the data on the mobile devices is pushed to all other clients viewing the same data 🙂 In the last image below, you can see the changes made on the mobile being pushed onto the application running on Mac.

Screen Shots:

View Products

View Products

View Products 2

View Products 2

Edit Product View

Edit Product View

Editing Product Name using Android Keyboard

Editing Product Name using Android Keyboard

Viewing Edited Product

Viewing Edited Product

Application Running on Mac

Application Running on Mac

Adobe Rocks 🙂


Slides and Source files from Data Centric Development session at devsummit

December 3, 2009

I had great time presenting Data Centric Development on Adobe Flash Platform at Adobe devsummit Chennai and Hyderabad. Thanks to all the speakers, community members and delegates for making this devsummit a great success 🙂 Please download the presentation and source files for the demos from the URLs below.

PRESENTATION

Please find the presentation (Some of my slides are from Christophe Coenraets presentation at Adobe MAX) at this URL https://acrobat.com/#d=iXpvdvfVGYYunqRt*xZ*6A

SOURCE FILES FOR DEMOS

Please download the Java and PHP source files used in the first two demos and set up as explained in the article at this URL http://flashahead.adobe.com/events/devsummit2009/lbd/lbd_setup_instructions.pdf

Flash Builder 4 DCD with Java

Demonstrated how Data-Centric Development features in Flash Builder 4 can be used to easily integrate Flex with J2EE backend. Please find tutorial on using Flash Builder with J2EE backend at this URL https://sujitreddyg.wordpress.com/2009/06/01/building-flex-application-for-blazeds-remoting-service-using-flash-builder-4/

Source file (Flash Builder 4 project): http://sujitreddyg.com/presentations/devsummit2009/demo1.fxp

Flash Builder 4 DCD with PHP

Demonstrated how Data-Centric Development features in Flash Builder 4 can be used to easily integrate Flex with PHP backend. Please find tutorial on using Flash Builder 4 with PHP backend at this URL https://sujitreddyg.wordpress.com/2009/06/01/building-flex-application-for-a-php-class-using-flash-builder-4/

Source file (Flash Builder 4 project): http://sujitreddyg.com/presentations/devsummit2009/demo2.fxp

Model Driven Development

Demonstrated how to do model driven development using Flash Builder 4 and LiveCycle Data Services 3. Please find tutorial on model driven development and setup instructions at this URL https://sujitreddyg.wordpress.com/2009/06/18/tutorial-on-model-driven-development-using-flash-builder-4-and-livecycle-ds-3/

Source file (Flash Builder 4 project): http://sujitreddyg.com/presentations/devsummit2009/demo3.fxp

Adobe Community Rocks 🙂


Building Flex and Java based CRUD application using Flash Builder 4

October 12, 2009

Updated for Flash Builder 4 release version 🙂

In this article we will create a CRUD application using Adobe Flex and Java. Flash Builder 4 allows you to build Flex front end for Java classes on the server with just couple of clicks, so we will use Flash Builder 4 to develop the application.

BlazeDS is a Java based server technology from Adobe which lets you invoke methods in Java class on server from your Flex applications. BlazeDS is the best solution for integrating Flex with Java so obviously we will use this in our sample project.

Below are the steps we will follow to complete our application

  1. Set up BlazeDS (copying files :))
  2. Expose Java class as Remoting service destination
  3. Use Flash Builder to generate Flex code to invoke methods in Java class on the server
  4. Retrieve data from server and display in the application
  5. Allow user to add/update/delete entries in a database table from the application

Article allows you to skip any of steps mentioned above and copy the code 🙂 Let’s get started 🙂

You can download the completed project from here http://sujitreddyg.com/fb4articles/release/BlazeDSCRUD.fxp

Set up BlazeDS

Download BlazeDS binary distribution from this URL Download (4MB) and follow instructions at this URL to setup BlazeDS https://sujitreddyg.wordpress.com/2009/04/07/setting-up-blazeds/

Once BlazeDS is setup you need to expose the Java class as Remoting destination, visit this URL to know how to expose a Java class as Remoting destination https://sujitreddyg.wordpress.com/2008/01/14/invoking-java-methods-from-adobe-flex/

After exposing your Java class as Remoting destination using BlazeDS, follow steps below to build the Flex application.

In this sample we will expose SimpleCustomerService.Java as Remoting destination. SimpleCustomerService communicates with database and returns SimpleCustomer objects.

Setting up BlazeDS RDSDispatchServlet

After setting up BlazeDS, you have to enable RDSDisptachServlet, which is used by Flash Builder 4 to get destination details. This is disabled by default. It’s very simple all you have to do is to un-comment/add the Servlet mapping in the web.xml.

Copy the Servlet URL mapping and declaration for the RDSDispatchServlet below and copy it into your web application web.xml under <web-app> node.

<servlet>
<servlet-name>RDSDispatchServlet</servlet-name>
<display-name>RDSDispatchServlet</display-name>
<servlet-class>flex.rds.server.servlet.FrontEndServlet</servlet-class>
<init-param>
<param-name>useAppserverSecurity</param-name>
<param-value>false</param-value>
</init-param>
<load-on-startup>10</load-on-startup>
</servlet>
<servlet-mapping id=”RDS_DISPATCH_MAPPING”>
<servlet-name>RDSDispatchServlet</servlet-name>
<url-pattern>/CFIDE/main/ide.cfm</url-pattern>
</servlet-mapping>

Install Flash Builder 4

Download and install Flash Builder 4 from this URL http://www.adobe.com/products/flashbuilder/

Creating new Flex project with BlazeDS server configurations

Create new Flex project

Create a new Flex project from File -> New -> Flex Project and enter project details as shown below.

In this screen:

  1. Enter project name
  2. set “Web (runs in Adobe Flash Player)” as the application type
  3. Use default Flex SDK (Flex 4.0)
  4. Set the application server type to J2EE
  5. Select BlazeDS
  6. Click on Next to continue

Configure J2EE server settings


In this screen:

  1. Set the Root folder to the root folder of your web application with BlazeDS configured. Its C:\Program Files\Apache Software Foundation\Tomcat 6.0\webapps\demo in this sample
  2. Set the Root URL to root URL of your BlazeDS enabled web application
  3. Set the Context root to context root of your BlazeDS enabled web application
  4. Leave the output folder to default value
  5. Click on validate configuration button
  6. Click finish to continue

Using DCD feature to connect to consume Remoting Service

DCD or Data-Centric Development is one of the advancements to the Flash Builder 4 which lets you develop data centric applications very easily. In this sample we will see how to create a Flex application which consumes BlazeDS Remoting service. Same steps can be followed for LCDS Remoting services also.

Creating Service using DCD


  1. Select the Data/Services window shown in the image above. If this is not visible, select it from Window -> Data/Services
  2. Click on “Connect to Data/Service” (highlighted in the image) in the Data/Services window
  3. Window as shown in the image below will be launched

Select BlazeDS and click on Next. Flash Builder will display a window asking for RDS credentials. Since we turned off security for our RDSServlet by setting the “useAppserverSecutiry” parameter to “false” in the web.xml, select “No password required” and click on OK to continue.

Selecting Remoting destination

You can see that Flash Builder listed all service destinations exposed from your web application as shown in the screen below.

In this screen we are selecting the destination the newly created service should use. Select a destination (SimpleCustomerServiceDestination in this sample) and click on Finish to continue.

Code for invoking the Remoting service will be generated, you can see the service and its operations (methods exposed by the Java class) being displayed in the “Data/Services” window and in the package explorer.

Flash Builder 4 introspects return types for the Java class methods and creates AS3 classes for any custom Java classes.  We have the service class ready, let’s create UI.

Creating UI

Please copy the code from this URL http://sujitreddyg.com/fb4articles/release/BlazeDSCRUD_1.mxml.txt into your main application file (BlazeDSCRUD.mxml in this sample). Code in the URL will add UI controls required for this sample application. After copying the code, your Flash Builder design view should look as shown in the image below.

Note: In this article to refer to a control, we will use value set for the id property of the controls.

Create Form for the Customer data type

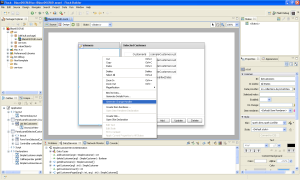
We will display the details of the customer entry selected in the listCustomers control (created in previous step) in formSelectedCustomer. Using Flash Builder you can bind a Form control to an entity instance.  Right click on the formSelectedCustomer and select “Bind to Data” as shown in the image below.

Flash Builder will display window as shown in the image below.

In this screen:

  1. We want the Form items to be generated based on a data type (SimpleCustomer) so select “Data type”
  2. Select SimpleCustomer from the list of data types
  3. We want the form to be editable, so select the “Make form editable” check box
  4. Click Next to continue
  5. Flash Builder will display the list of properties in the selected data type as shown in the image below. Flash Builder will also assign a UI control which it will use to display the property value as shown in the image below.

In this window, you can select the items which you want to be included in the form and UI control in which you want the property value to be displayed. You can also arrange the controls in the order in which you want them to be displayed. Arrange the properties and modify the controls as shown in the image above.

Flash Builder will add FormItems to formSelectedCustomer and binds the values of the controls under formSelectedCustomer to SimpleCustomer instance. In this sample Flash Builder generated a SimpleCustomer instance with “simpleCustomer” as its id. So we will refer to the SimpleCustomer instance bound to the items in formSelectedCustomer as simpleCustomer.

Binding data to UI Controls

Now that we have our UI ready, let’s get the data from the server and display it in the application.

Right click on the List and click on “Bind to Data ..” as shown in the image below.

Flash Builder will display window as shown in the image below.

In this screen:

  1. Select New service call
  2. Set Service to SimpleCustomerServiceDestination
  3. Set Operation to getAllCustomers(): SimpleCustomer[]
  4. Set Bing to field to customerName
  5. Click on OK to continue

In previous step we bound the service call result to listCustomers component, listCustomers will send a request to the getAllCustomers() function on the server and displays the result.

listCustomers is displaying only the name of the customer, so let’s display complete details of the  customer in formSelectedCustomer. Right click on the listCustomers and select “Generate Change Handler” as shown in the image below.

Flash Builder will generate a function which will be invoked when user selects a different item in the listCustomers. Flash Builder will also switch the view to Source view as shown in the image below, so that you can write code in the handler function generated.

Add the code below to the generated change handler function as shown in the image above.

simpleCustomer = listCustomers.selectedItem as SimpleCustomer;

In the code snippet above, simpleCustomer is the instance of SimpleCustomer which was bound to the formSelectedCustomer. In the code above, we are passing the reference of the selected SimpleCustomer instance in listCustomers to the SimpleCustomer instance bound to formSelectedCustomer. This line of code will populate formSelectedCustomer with details of the selected customer in listCustomers control.

Now, let’s keep formSelectedCustomer populated with values of the first customer entry in listCustomers as soon as the customer data is loaded from the server.

Understanding the CallResponder

How will you know when the data is returned from the server? For each service call generated in the application there will be a CallResponder class instance associated with it. CallResponder dispatches result event when the call to the service is successful and the data returned from the server can be accessed using a property called lastResult in CallResponder instance. To map the CallResponder instance with the service call, you have to pass the reference of the AsyncToken returned by the service call to the token property of the CallResponder.  You can see service call AsyncToken reference passed to the CallResponder in listCustomers_creationCompleteHandler function as shown below.

protected function listCustomers_creationCompleteHandler(event:FlexEvent):void

{

getAllCustomersResult.token = simpleCustomerServiceDestination.getAllCustomers();

}

CallResponder class will dispatch result event when the data is retrieved successfully from the server. You can add a handler to the result event to perform any logic when the server response is successful. In our case we will keep the first Customer in the listCustomers to be selected and its value to be displayed in formSelectedCustomer as soon as the data from the server is loaded on to the client.

Add a result event handler to the getAllCustomersResult CallResponder as shown in the image below.

In the generated result handler add the following code. In the code below list is the List instance added in previous steps.

if(listCustomers != null)

{

listCustomers.selectedIndex = 0;

simpleCustomer = listCustomers.selectedItem as SimpleCustomer;

}

You can observe that Flash Builder also generated a Button (id=”button”) and also generated a click handler (button_clickHandler) for the Button, in which code to bind the values in the Form (id=”formSelectedCustomer”) to simpleCustomer object. Just delete the Button and the click handler.

You can see the BlazeDSCRUD.mxml file with code till this step at this URL http://sujitreddyg.com/fb4articles/release/BlazeDSCRUD_2.mxml.txt

At this point you can save and run the application. Application will launch in a browser and displays the data retrieved from the server as shown in the image below. You can view details of the customs by selecting them from the list.

Performing Add/Update/Delete operations

In the SimpleCustomerService Java class on the server we have methods which can perform Add/Update/Delete operations in the database. If you observe Flash Builder generated AS3 functions in SimpleCustomerServiceDestination.as class for each public method of the selected Remoting destination including the addCustomer() , updateCustomer() and deleteCustomer(). We just have to invoke these AS3 function in order to invoke corresponding Java method on the server.

Let’s invoke functions in the SimpleCustomerDestination AS3 class when user clicks on Add/Update/Delete buttons created earlier.

Right click on the button labeled “Add” (id = “btnAdd”) and select “Generate Service Call ..” as shown in the image below.

Flash Builder displays window as shown in the image below, in which you can select the service call which you want to invoke when user clicks on the Button.

In this screen:

  1. Set the Service to SimpleCustomerServiceDestination
  2. Set the Operation to addCustomer(arg0:SimpleCustomer)
  3. Click on OK to continue

The addCustomer function selected expects an argument of the type SimpleCustomer . So Flash Builder 4 will switch to the source view and lets you enter the argument as shown in the image below.

Let’s pass the changes made in the Form (id=”formSelectedCustomer”) to the simpleCustomer instance and then pass simpleCustomer as an argument to the addCustomer function as shown in the image above. Code in the button click handler function will look as shown below. In the code snippet below we are passing the AsyncToken returned by addCustomer function to addCustomerResult, so that addCustomerResult object will dispatch result event when the service call is successful.

protected function btnAdd_clickHandler(event:MouseEvent):void

{
simpleCustomer.customerName = customerNameTextInput.text;
simpleCustomer.customerType = customerTypeTextInput.text;
simpleCustomer.customerAddress = customerAddressTextInput.text;
addCustomerResult.token = simpleCustomerServiceDestination.addCustomer(simpleCustomer);

}

Similarly generate service calls for Update and Delete buttons, select updateCustomer and deleteCustomer operations respectively and pass the same simpleCustomer object with modified values as argument. After generating service calls for other two buttons your application code in this URL http://sujitreddyg.com/fb4articles/release/BlazeDSCRUD_3.mxml.txt

Clicking on the Add/Update/Delete buttons will reflect the changes on the server. Let’s get the updated collection of customers from the server by invoking getAllCustomers function of the SimpleCustomerServiceDestination class if the Add/Update/Delete operations are successful.

You will have CallResponder instances created for Add, Update and Delete service calls in the application, invoke getAllCustomers() function in the result event of these call responders so that we will get updated customers list after Add, Update and Delete operation are performed successfully.

You can view/copy the completed BlazeDSCRUD.mxml file at this URL http://sujitreddyg.com/fb4articles/release/BlazeDSCRUD.mxml.txt

Save and run your application. You will see your application launched in a browser and ready for performing CRUD operations on the database entries.

Data centric applications can be developed very easily and effectively using Data Centric Development features in Flash Builder 4. Try enabling client side data management and client side data paging for the service used in this article, you can find the articles at the URL below. Please find more articles on using features in Flash Builder 4 at this URL https://sujitreddyg.wordpress.com/flash-builder-4/

Adobe Rocks 🙂


Adobe LiveCycle Data Services 3 beta is here

June 18, 2009

Adobe LiveCycle Data Services 3 beta is here. As always LCDS team has added lots of new features and made improvements to existing features. With LCDS 3 beta application development is much faster and developers can use features like Reliable communications and Data throttling.

We have new technology from Adobe, code named Fiber. Fiber lets you do model-driven development. With this release of LCDS, Adobe also released a graphical modeling editor called Fiber modeler plugin, which allows you to use Flash Builder 4 with LCDS 3 to create a complete RIA by just pointing to your tables in the database. You don’t have to write any server side code, LCDS 3 creates the assembler required, creates data management destination and hence all ready to consume it from Flex applications. We all know that with Flash Builder 4, consuming data services is just few clicks as explained at this URL https://sujitreddyg.wordpress.com/2009/06/01/building-flex-application-for-blazeds-remoting-service-using-flash-builder-4/

Tutorial on model-driven development using Flash Builder 4 and LiveCycle DS 3

Please find more details on what’s new in LiveCycle Data Services 3 beta at this URL http://www.adobe.com/devnet/livecycle/articles/lcdses3_whatsnew.html

I already downloaded LCDS 3 and am using it, it’s too good. Download LiveCycle Data Services 3 beta at http://labs.adobe.com/technologies/livecycle_dataservices3/

Adobe rocks 🙂


AIR based Tool to generate Flex code for consuming/exposing BlazeDS Remoting services

May 7, 2009

Thanks for showing interest in BlazeMonster. Please find details at this URL https://sujitreddyg.wordpress.com/blazemonster/

Thank you 🙂


Setting up BlazeDS

April 7, 2009

This article explains how to setup BlazeDS for your J2EE web application.

BlazeDS adds a lot of power to your web applications. You can expose your Java classes as Remoting services. You can use the Messaging service of BlazeDS to expose publish subscribe messaging destinations and also use the Proxy service to invoke other services.

More details about BlazeDS can be found at this URL http://opensource.adobe.com/wiki/display/blazeds/BlazeDS

Updated: Free AIR based Tool to generate Flex code for consuming/exposing Java classes as BlazeDS Remoting services. Visit this URL for more details https://sujitreddyg.wordpress.com/2009/05/07/blazemonster/

Just follow the steps below you will have BlazeDS setup in no time 🙂

Getting BlazeDS

Step 1:

Download release build of BlazeDS. BlazeDS release builds are available at this URL http://opensource.adobe.com/wiki/display/blazeds/Release+Builds Click on “Download the BlazeDS binary distribution” to download the binary distribution. Binary distribution has just jar files and other configuration files required.

Step 2:

Go to folder where you saved the downloaded file in Step 1. You would have downloaded a file named blazeds-bin-4.0.0.14931.zip. Extract the content in this file to a folder named blazeds-bin-4.0.0.14931

Step 3:

In the blazeds-bin-4.0.0.14931 folder you will find a file named blazeds.war and blazeds-bin-readme.htm. blazeds-bin-readme.htm contains terms and conditions and license details. blazeds.war contains required jar files and configuration files for setting up BlazeDS.

Extract the content in blazeds.war file into a folder called blazeds. You can extract the content using tools like winzip.

Now we have downloaded and have the required files extracted to setup BlazeDS for a web application. Let’s create a web application.

Creating web application

If you don’t have Tomcat installed, install Tomcat from http://tomcat.apache.org/

Step 4:

In your Tomcat installation directory, you will find a folder named webapps. Usually it is at this location on Windows Operating System “C:\Program Files\Apache Software Foundation\Tomcat 6.0\webapps”

Create a web application named samplewebapp. You do this by just creating folder named samplewebapp under webapps folder.

Setting up BlazeDS

We will setup BlazeDS for the web application created in the previous step.

blazeds – this is the folder in which we have blazeds.war content extracted into  in Step 3

samplewebapp – this is the folder created in Step 4

Step 5:

Copy all .jar files from blazeds/WEB-INF/lib to samplewebapp/WEB-INF/lib

Step 6:

Copy blazeds/WEB-INF/flex folder to samplewebapp/WEB-INF

This folder (blazeds/WEB-INF/flex) contains BlazeDS configuration files. Use these files to configure Remoting/Messaging/Proxy services.

Step 7:

Now we will add Servlet mapping for BlazeDS Servlet named MessageBrokerServlet, so that BlazeDS is invoked when you send request for a Remoting/Messaging/Proxy destination using any of the channels supported.

Copy blazeds/WEB-INF/web.xml to samplewebapp/WEB-INF

If you already have a web.xml configured, then you can just copy the Servlet mapping for MessageBrokerServlet and the session listener. You can either copy the content below or copy it from the blazeds/WEB-INF/web.xml

<!-- Http Flex Session attribute and binding listener support -->
<listener>
<listener-class>flex.messaging.HttpFlexSession</listener-class>
</listener>
<!-- MessageBroker Servlet -->
<servlet>
<servlet-name>MessageBrokerServlet</servlet-name>
<display-name>MessageBrokerServlet</display-name>
<servlet-class>flex.messaging.MessageBrokerServlet</servlet-class>
<init-param>
<param-name>services.configuration.file</param-name>
<param-value>/WEB-INF/flex/services-config.xml</param-value>
</init-param>
<load-on-startup>1</load-on-startup>
</servlet>
<servlet-mapping>
<servlet-name>MessageBrokerServlet</servlet-name>
<url-pattern>/messagebroker/*</url-pattern>
</servlet-mapping>

That’s it you have BlazeDS setup for your web application. 🙂

Now that you have BlazeDS set up you can try invoking Java methods from your Flex applications or create a simple chat application. You can find articles at the URLs below.

https://sujitreddyg.wordpress.com/2008/01/14/invoking-java-methods-from-adobe-flex/

https://sujitreddyg.wordpress.com/2008/01/17/messaging-using-flex-and-blaze-ds/

https://sujitreddyg.wordpress.com/2008/02/12/handling-java-exceptions-in-flex-application/

Adobe Rocks!!! 🙂


BlazeDS adapter to invoke multiple classes on a Remoting destination

January 22, 2009

What is this?

In BlazeDS and LCDS Remoting service, JavaAdapter class allows us to invoke methods on a Java object.  If we want to invoke methods on a Java class, we declare destination for each class we want to be invoked from Flex applications in remoting-config.xml.

I extended the default JavaAdapter and added very very few lines of code so that Flex application can invoke Java classes by specifying the Java class name in the Flex application. Don’t worry, modified adapter allows you to control access to classes using regular expression and other ways.

This will be useful if you have lots of classes, which you want expose as service. Instead of declaring destinations for each class in the remoting-config.xml file, you can use this adapter and expose all required classes by declaring one destination.

What does this adapter let me do?

1.       Specify the name of the Java class in Flex application and invoke methods on that class

2.       You can control access to classes based on regular expression. If you want to allow access to classes in “com.adobe” package only, you can set the source of the destination to “com.adobe.*”.

3.       Declare a default Java class, which will be used if Flex application doesn’t specify the Java class to be used.

4.       From the list of classes allowed in a package, you can exclude few classes

5.       You can specify scope for each class. For example you want instances of 2 classes in the allowed package to be stored in a session or application scope, you can do that.

How to use this adapter?

Adding adapter class to your web application classpath

Download the MultiClassJavaAdapter .java file from this URL http://sujitreddy.g.googlepages.com/MultiClassJavaAdapter.java

Compile it and copy that under WEB-INF/classes folder of your web application in appropriate package structure.

Declaring in remoting-config.xml

The remoting-cong.xml file is explained below. You can download the completed remoting-config.xml file from this URL http://sujitreddy.g.googlepages.com/remoting-config.xml

In the configuration file (remoting-config.xml) file downloaded, you can find we have added our adapter (com.adobe.remoting.adapters.MultiClassJavaAdapter) to the adapters list as shown in the XML snippet below.

<adapters>

<adapter-definition id=”any-java-object” class=”com.adobe.remoting.adapters.MultiClassJavaAdapter”/>

</adapters>

We have destination with id “AnyJavaClass” declared. This destination has its adapter set to the adapter added above using the adapter element.

<destination id=”AnyJavaClass”>

<adapter ref=”any-java-object”/>

</destination>

You can give a regular expression in the configuration file, which will be used to evaluate if a Java class can be invoked by the Flex application on this destination. You will use source property to specify this regular expression as shown below.

You can declare a default Java class, which will be used if the Flex application doesn’t specify the name of the Java class to use. Set the default Java class name using default-source element as shown below.

<destination id=”AnyJavaClass”>

<properties>

<source>com.adobe.*</source>

<default-source>MultiClassAdapterTest</default-source>

</properties>   </destination>

As per declaration above, Flex application can invoke any class under “com/adobe” folder. You might want not want to allow access for few classes in this package. In that case you can declare list of classes you don’t want to exclude as shown below.

<destination id=”AnyJavaClass”>

<properties>

<exclude-classes>

<class name=”com.adobe.ExcludeClass1″/>

<class name=”com.adobe.ExcludeClass2″/>

</exclude-classes>

</properties>    </destination>

By default when there is a request to invoke method on a class, a new instance of that class is created in the request scope. You might want to keep the instances created in application or session scope. Since we are allowing multiple classes to be invoked using single destination, you can declare names of the classes and scope in which you want to store them as shown below.

<destination id=”AnyJavaClass”>

<properties>

<classes-scopes>

<class name=”MultiClassAdapterTest” scope=”session”/>

<class name=”com.adobe.TestClass” scope=”application”/>

</classes-scopes>

</properties>    </destination>

Flex application to test the adapter

Download the MXML file from this URL http://sujitreddy.g.googlepages.com/MultiClassAdapterTesting.mxml

In the file downloaded, you can see that we will use the source property of the RemoteObject class to specify the name of the class to invoke the method on.

That’s it, now you can declare one destination and invoke methods on multiple classes. Still you can control access to classes.

Please feel free to use/edit/delete this class. Any suggestions are most welcome. 🙂

Adobe rocks 🙂